After installing Microsoft windows 10 IoT core on the microSD card, you must put it on your mini-computer board like Raspberry Pi or other boards. (I used RaspberryPi for my projects, so the default board of my posts is RaspberryPi). After putting the microSD card that is installed windows 10 IoT core on it, turn the device on and connect it with Ethernet to a network. If you have a connected display to the board or connect via remote applications such as Windows IoT Remote Client Application, you can see the below screen.
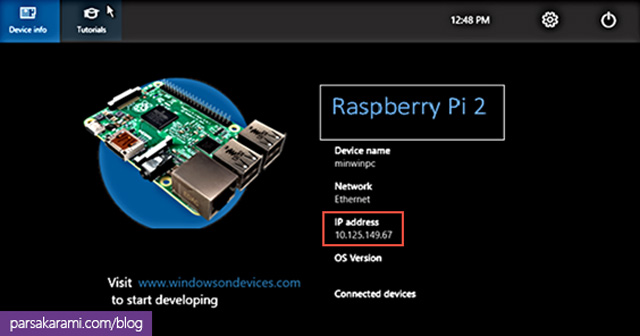
In the specified red box on the view, you see the current IPAddress of the Windows IoT device. If you don`t have a display device or cannot access the remote application to see the current IPAddress, you can use Windows 10 IoT Core Dashboard. You can see the screenshot of this application below and download it from this link.
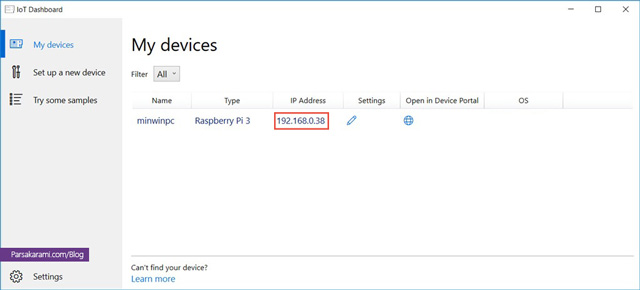
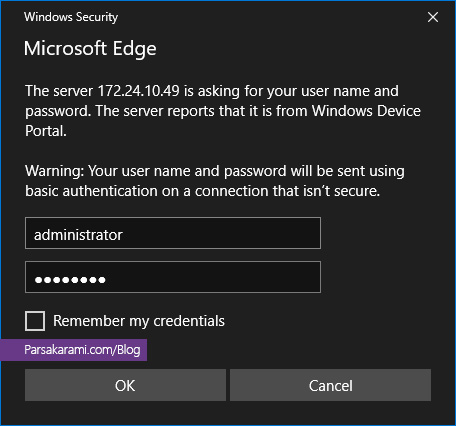
In the Windows 10 IoT Core Dashboard application, connected devices appear in the list. Then you can see your board and its IPAddress as well. Now you can copy the IPAddress and enter it in the browser with the following pattern "HTTP://[Your Device IP Address]:8080 ". After entering, a login form will open and ask you to type Username and Password to get secure access to the windows device portal.
After successful login, you can see the Windows Device Portal. It gives you some functions to change system settings and monitor system stats in Windows Device Portal.
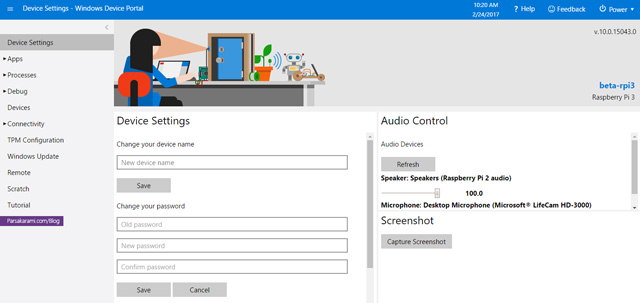
You can see the functionalities of windows IoT in each section on the left side of the portal, each function map to an API, and when you use it throughout the portal windows IoT calls these APIs from itself. See the windows device core API on this page.
For changing the IPAddress of windows IoT, I can extract the address of API with Telerik Fiddler when that is called from the portal. For example, to set a new IPAddress on the device, you must use this API: " HTTP://[Your Device IP Address]:8080/API/Network/Ipv4config ".
This API verb is the PUT. The API call needs an Authentication header which is filled by the Username and Password. For changing the IPAddress, you must call this API from the UWP application that runs in windows IoT. In this sample, you see a textbox that gets customer IPAddress from a user and a button that sets IPAddress on the device. You also see a button that gets the current IPAddress of windows IoT and shows it on a text block. After adding an authentication header, you must create a string with JSON format that is used to change network interface properties.
1st step: Creating an object from HttpClient class
     HttpClient client = new HttpClient();
     client.BaseAddress = new System.Uri("http://127.0.0.1:8080/", UriKind.RelativeOrAbsolute);
2nd step: Adding authentication header to get access API
     client.DefaultRequestHeaders.Authorization = new AuthenticationHeaderValue(
     "Basic",Convert.ToBase64String(System.Text.ASCIIEncoding.ASCII.GetBytes(
     string.Format("{0}:{1}", "administrator", "p@ssw0rd"))));
3rd step: Defining a class for creating JSON object that represents the network interface
     public class NetworkConfiguration
     {
          public string AdapterName { get; set; }
          public string IPAddress { get; set; }
          public string SubnetMask { get; set; }
          public string DefaultGateway { get; set; }
          public string PrimaryDNS { get; set; }
          public string SecondryDNS { get; set; }
     }
4th step: Getting Adapter Name from the windows device portal and put your customized value for setting new network configuration on windows IoT with creating a new object from NetworkConfiguration class
     NetworkConfiguration networkConfiguration = new NetworkConfiguration()
     {
          AdapterName = "{CF2A43ED-F038-4411-BB0D-EA71D5604B5E}",
          IPAddress = "192.168.1.120",
          SubnetMask = "255.255.0.0",
          DefaultGateway = "192.168.1.1",
          PrimaryDNS = "0.0.0.0",
          SecondryDNS = "0.0.0.0"
     };
5th step: Converting object to JSON string
string json = JsonConvert.SerializeObject(networkConfiguration);
6th step: Creating a HttpContent for sending JSON using API
HttpContent content = new StringContent(json);
7th step: Using PutAsync method to put value in API for editing the current value
var result = await client.PutAsync("api/networking/ipv4config", content);
8th step: Using GetLocalIPAddress method for getting current IPV4 address
     private static string GetLocalIPAddress()
     {
          try
          {
               var icp = NetworkInformation.GetInternetConnectionProfile();
               if (icp?.NetworkAdapter == null) return null;
               var hostname = NetworkInformation.GetHostNames().SingleOrDefault(
                              hn => hn.IPInformation?.NetworkAdapter != null &&
                              hn.IPInformation.NetworkAdapter.NetworkAdapterId == icp.NetworkAdapter.NetworkAdapterId);
               return hostname?.CanonicalName;
          }
          catch (Exception ex)
          {
               return "an Error occured";
          }
     }
You can also get the project file and fork it on Github.

