

The date and time are crucial to developing reliable and trustworthy applications regardless of platform. In this post, I want to show how you install and use the missing Real-Time Clock (RTC) to the Raspberry Pi board with Microsoft Windows 10 IoT Core OS.
If you do not know how can install windows 10 IoT core on raspberry pi and other same mini-computers (such as Qualcomm dragonboard, intel Minno board max, intel Jule), follow this link. At this point, I assumed you have a raspberry pi with windows 10 IoT core os. If you have, it's time to get ready to lift off.
For the first step, we must buy an RTC module. For this example, I've chosen the DS3231 module. But you can choose among other options. After getting the RTC module, you must connect it through the I2C port in order to communicate with your board and your application. You can see the module and ports below. You should link the module using the I2C serial port in RPi. 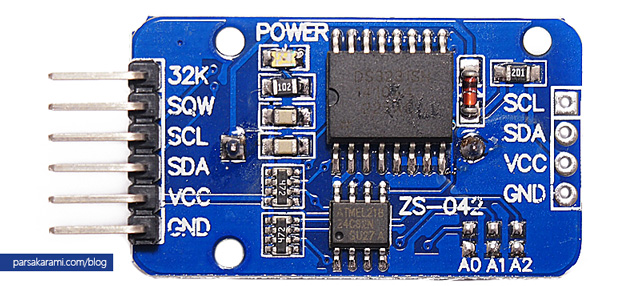
There are four pins needed to communicate. The first is GND (call Ground) which represents the ground connection. The second one is VCC, which prepares the required voltage for the module to work. In this module, the required voltage is 3.3V. Two remaining pins are SDA and SCL, which are used for communicating with applications. If you don`t know how I2C works, you should read about it for more details in this Link.
Refering to Wikipedia you can see the below description:
The I2C bus was designed by Philips in the early '80s to allow easy communication between components which reside on the same circuit board. Philips Semiconductors migrated to NXP in 2006. The name I2C translates into “Inter IC”. Sometimes the bus is called IIC or I²C bus.
Now see the following Raspberry Pi pin map image for finding what port must be connected to what pin.
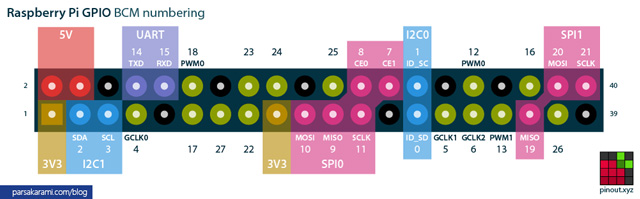
Let`s start with VCC. See the first row of raspberry pi pins and connect VCC to the first pin that is specified with yellow color. Then link the GND pin to the 5th PIN from the left in the first row. After that, connect the SDA to the second pin from the left in the first row. Then link the SCL to the next one. The module is connected to raspberry pi successfully, and it is ready to use. For using the I2C serial port in the UWP application that you want to run on windows IoT, You must add a reference to Windows IoT Extensions for UWP to your project. After that, add the below namespace to use I2cController and I2cConnectionSettings class.
using Windows.Devices.I2c;
You need to know two things before starting communication with the RTC module. First is, each module that connects through the I2c serial port needs a Bus Address for connecting. The bus Address is (0x68) in this module. You have to send it as an argument to the constructor of I2cConnectionSettings class. The second thing is in this module, the year is calculated from 2000. To understand how it is calculated, you should follow this example. If the module returns 17 at the last index of the buffer, it means the year is equal to 2017. When you request time from the module, the return value is an array with eight items. The other point is the date and times that are returned from or sent to the module must be formated in BCD. To make it more straightforward, I wrote two functions that convert BcdToDec and DecToBcd you can see them below.
     private byte DecToBcd(byte val)
     {
          return Convert.ToByte((val / 10 * 16) + (val % 10));
     }

     private byte BcdToDec(byte val)
     {
          return Convert.ToByte((val / 16 * 10) + (val % 16));
     }
After getting the return value from the module, the first item at zero indexes represents the Seconds in the time. The next one represents the Minutes, and The next one is the Hours. The two next is the Day of the week and the Day of the month in the date. The last two represent the Month and the Year after 2000 in date. You can see the ReadDateTime() method, which requests the date and time from the module. For getting the date and time, you must write the 0x00 and send ut to the module. Finally, you should read data from a module like below.
      public async Task ReadDateTime()
      {
           I2cController i2c = await I2cController.GetDefaultAsync();
           I2cConnectionSettings setting = new I2cConnectionSettings(0x68);
           setting.BusSpeed = I2cBusSpeed.StandardMode;
           var device = i2c.GetDevice(setting);
           byte[] writeBuf = { 0x00 };
           device.Write(writeBuf);
           byte[] buffer = new byte[7];
           device.Read(buffer);
           byte second = BcdToDec((byte)(buffer[0] & 0x7f));
           byte minute = BcdToDec(buffer[1]);
           byte hour = BcdToDec((byte)(buffer[2] & 0x3f));
           byte dayOfWeek = BcdToDec(buffer[3]);
           byte dayOfMonth = BcdToDec(buffer[4]);
           byte month = BcdToDec(buffer[5]);
           int year = 2000 + BcdToDec(buffer[6]);
           DateTime dt = new DateTime(year, month, dayOfMonth, hour, minute, second);
           device.Dispose();
           return dt;
      }
And you can also use your date and time to module with WriteDateTime() method.
     public async Task WriteDateTime(DateTime dateTime)
     {
          I2cController i2c = await I2cController.GetDefaultAsync();
          I2cConnectionSettings setting = new I2cConnectionSettings(0x68);
          setting.BusSpeed = I2cBusSpeed.StandardMode;
          int year = int.Parse(dateTime.Year.ToString().Substring(2, 2));

          var device = i2c.GetDevice(setting);
          byte[] writeBuffer = new byte[8];
          writeBuffer[0] = 0x00;
          writeBuffer[1] = DecToBcd(Convert.ToByte(0));
          writeBuffer[2] = DecToBcd(Convert.ToByte(dateTime.Minute));
          writeBuffer[3] = DecToBcd(Convert.ToByte(dateTime.Hour));
          writeBuffer[4] = DecToBcd(Convert.ToByte(dateTime.DayOfWeek));
          writeBuffer[5] = DecToBcd(Convert.ToByte(dateTime.Day));
          writeBuffer[6] = DecToBcd(Convert.ToByte(dateTime.Month));
          writeBuffer[7] = DecToBcd(Convert.ToByte(year));
          device.Write(writeBuffer);
          device.Dispose();
     }
I used Singleton Pattern to use the RTC module in my app to prevent concurrency conflict during reading from and writing to the module. You can use my class and code and get it from Github with this Link.